

 Share This Page
| Home | | Computer Graphics | | | | Share This Page |
Version 1.0 2017.03.12
(double-click any word to see its definition)
First, in this article the term Blender refers to a program people use to create computer graphics.
I've been creating computer graphics for a long time, starting so long ago that the term "computer graphic" meant a pencil drawing based on computer data. Given that beginning, you may be able to imagine how amazed I am by the possibilities of modern computer graphics — I can create in a matter of minutes what once required days of effort.
Pov-Ray
Digression — click here to see one of my earlier computer images, created with an elegant, almost purely mathematical ray-tracing program called Pov-Ray (read my Pov-Ray articles).But there's a drawback to modern computer-generated images — the nice ones, the "keepers," require a lot of time to render. Aware of this problem, movie production companies render their computer animation images with gigantic "render farms" that easily cost millions of dollars for a modest installation. The reason is that computer images are essentially solutions to mathematical equations that specify the location and color of each picture element (pixel) on the computer display. This means modern computer graphic renders involve one of the most difficult and time-consuming kinds of processing — floating-point mathematical operations.
Rendering Speed and Resource Issues
Dreamworks, one of the better-known names in the computer animation business, has a render farm consisting of 25,000 cores spread across multiple locations1. During active production a given project may use 20,000 of those cores at a time, and (according to the source linked above) require 50 million hours of total computer processing time (I think this means the number of hours that would be required if only one core performed the entire render).
This article addresses the render-time problem for individuals and small groups, and my particular focus is on the rendering of single images, not animations. Ironically, as I discovered during the technical phase of this project, it's easier to create an efficient rendering plan for a single image across a network than it is for an animation (because a single image can be sliced into custom-sized strips for rendering).
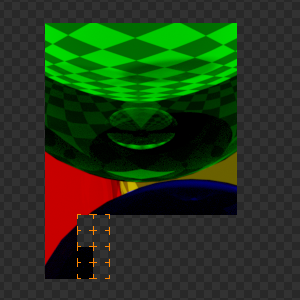 Figure 1: Blender rendering 8 simultaneous
tiles (orange squares) on an 8-core machnine.Local Network Render
My method uses a small local network of machines, each of which has a copy of Blender installed as well as a way to communicate with other machines on the network. This scheme could be expanded — because my method communicates using Secure Shell, it could easily and securely accommodate Internet-based renderers in the same way.
Windows Compatibility
This program runs on Windows as well as Linux. It runs better on Linux, true for most things, and it's trickier to install, set up and use on Windows, also true for most things, but it can be done. Once the rather complicated Windows setup is complete, the program works well, almost well enough to postpone switching over to Linux (which I obviously recommend to everyone).
When Blender renders an image on a single-core machine, it breaks the task up into "tiles" whose size is under the user's control, and (on a single-core machine) renders the tiles one at a time. If the machine has more than one processing core, Blender takes advantage of this and simultaneously renders as many tiles as there are cores (Figure 1, orange squares).
Large, Complex Images
That sounds like a pretty efficient use of available resources — most computer programs don't know how to exploit more than one core. But as time passes, graphic images are getting larger and more complicated — one class of image I've been working with has dimensions of 16384x4096 pixels (more than 67 million pixels) — it's a special 360° equirectangular-projection 3D stereo rendering suitable for viewing with a VR headset. Even a simple image in this class (example: Glass Spheres on Checkerboard (24 MB)), created just for testing, can require an hour to render on a single 8-core machine. Click here to find out how to view the above-linked image in a Gear VR viewer.
Here's how to view my Glass Spheres on Checkerboard test 3D 360° image:
- Download the image by right-clicking the link and choosing "Save link as ..." or similar wording on your browser.
- Upload the image to your Oculus-equipped Android cell phone, put it in directory
/sdcard/Oculus/360Photos.- Put your cell phone into a Gear VR viewer, run Oculus 360 Photos, choose the uploaded image and enjoy.
- Almost forgot — here's the Blender definition file for the image.
This program addresses the issue of rendering complex single images, not animations. There are already some methods available to deal with the task of rendering animations, one of which is available as an add-on to Blender — click here for more details. I needed a way to speed up single-image renders, something existing programs can't do.
For an animation (multi-image) networking method (not this article's topic):
- In Blender select File ... User Preferences ... Add-Ons ... Enter search string "network" ... then choose Render: Network Renderer.
- Follow these instructions to get it working (the instructions are not very clear and setting this method up is not easy).
Fast and Slow Machines
The program this article describes can network-render single, complex images that might otherwise require hours of time to render on a single machine. The speed improvement is more or less proportional to the number of machines available, assuming they have similar speeds and number of cores. But more importantly, because of the speed tests and adjustments available, one can use a combination of fast and slow machines without letting the slow machines hold up the render.
Rendering Tiles
Ideally, and certainly sometime in the future, programs like Blender would be configured to automatically send individual tiles to networked machines for rendering. That would be a great improvement over current methods, because as soon as a machine got done rendering a small number of tiles, it could be assigned new work. This would solve a scheduling problem in which (absent speed testing and profiling) a network of faster and slower machines aren't exploited very efficiently — it's nearly always the case that one or another machine becomes idle while others are still working.
Rendering Strips
In the method described here, vertical strips of the image are assigned to individual machines for rendering, after a speed test determines the relative speeds of the machines. In a perfect world, one in which all graphic images — and all the regions of the images — had the same level of complexity, a simple floating-point processor speed test, followed by a render that assigned work based on the test outcome, would assure that all the machines would finish more or less together (which is the most efficient rendering outcome). But because images have varying degrees of complexity in different spatial regions, a simple speed test doesn't work very well (except when averaged across a large set of images). Another kind of speed test uses a small example of a particular target image to test network speeds in advance of a long render. My program offers both these methods for assessing network speed.
Using this method, a typical workflow would be:
- Choose a Blender image file for rendering, one you want to create as a single render (i.e. not an animation).
- Create a small, relatively fast-rendering version of the image definition file for testing purposes.
- Use the blender_network_render.py Python script to distribute the test definition across the network for a speed run. The speed test creates and saves a network speed profile for later use during a longer render.
- With the same program and using a full-scale, high-quality version of the Blender image definition file, perform the actual network render, applying the network speed profile created during the test above.
Here's some more detail. Consider this image (click here for the defining Blender file):
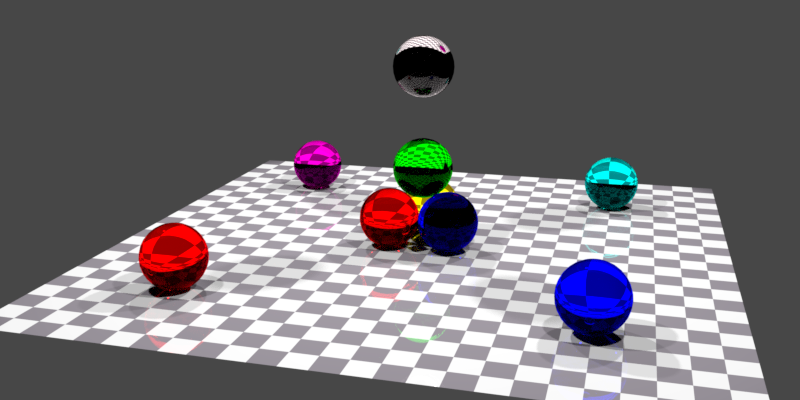
Figure 2: Glass Spheres on Checkerboard
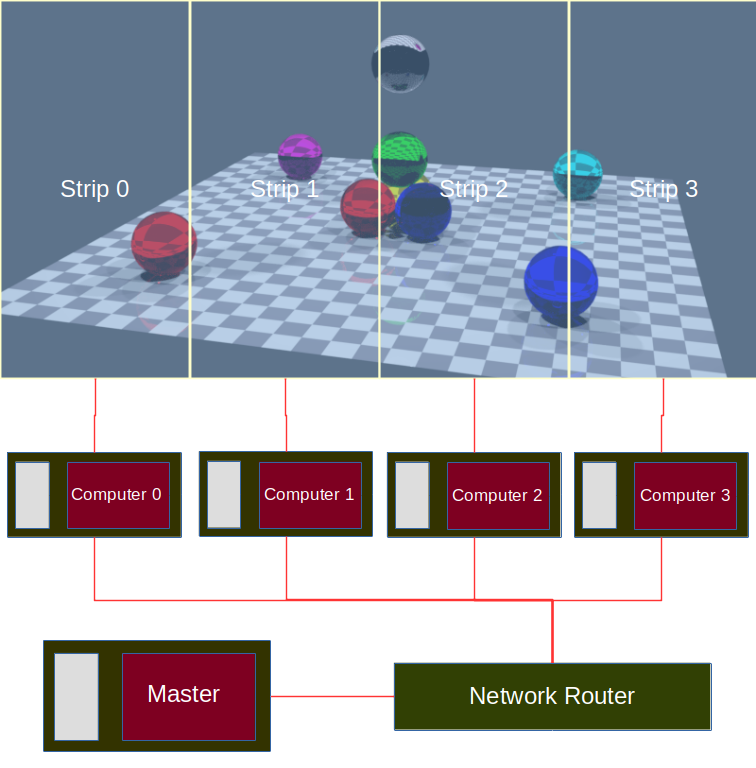
My program splits this image into as many vertical strips as there are participating machines, and assigns one strip to each machine. Let's say we have four networked machines available — we might create strips like this:
Figure 3: Initial Network render configuration (uniform image strip widths)For simplicity's sake Figure 3 omits an important detail — the so-called "master" machine at the lower left, the machine that provides the image definition and oversees the process, can (and should) be one of the rendering machines as well, otherwise it sits out the render doing almost nothing. Figure 3 is a simplified diagram that omits this important detail.
Practical Issues and Limitations
The above scheme for assigning network resources would work all right if all the machines in the network were identical and had the same access speed, and if the image's complexity was uniform from place to place. But neither of those is likely to be true, so my program performs two kinds of speed test to more efficiently assign network resources.
Sped Test 1: Machine Speed
The machine speed test assigns each computer the task of performing a long sequence of floating-point operations and tallies the result. The speed test computes and saves a network profile based on this result, which assigns more work to the faster machines.
Speed Test 2: Image drawing speed
The image speed test uses a small version of a given image to test the network machines in a way that takes into account both the machine speed and the specific traits of the image to be rendered. This is the most accurate test, but it requires the user to create a small-scale version of the image to be rendered in full-scale.
Profile Creation
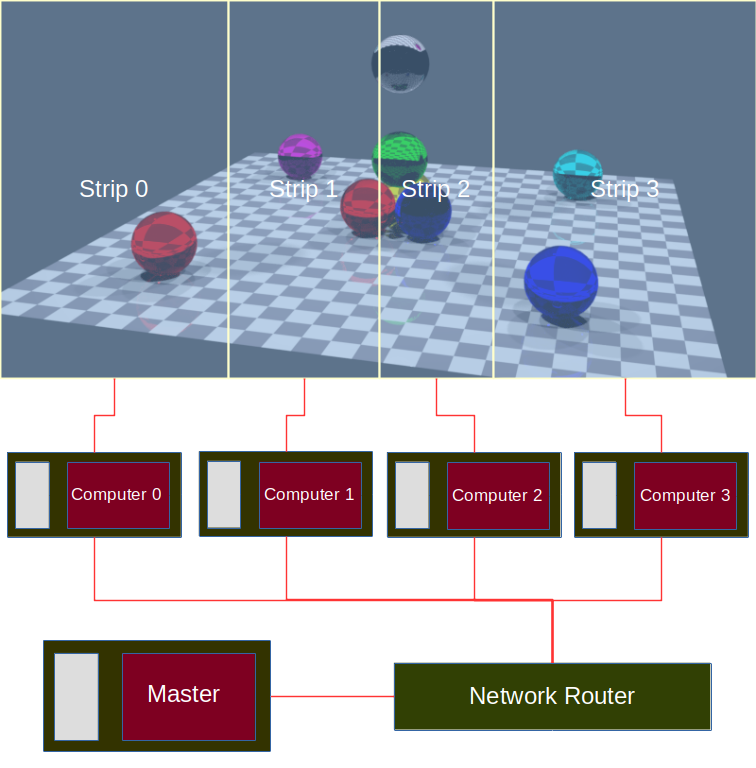
With the results of a speed test in hand, creating a network speed profile is relatively simple — In Speed Test 1 the fastest machines are assigned a wider image strip than the slower machines, and in Speed Test 2, both the machine's speed and the complexity of the image are taken into account. But the basic idea is that more work is assigned to faster machines and less to those that must process the more complex parts of an image. The result might look like this:
Figure 4: Network render configuration after speed test (adjusted image strip widths)For the result of Speed Test 1, in Python a profile is created like this:
inverse = [1/x for x in speed_results]
total = sum(inverse)
profile = [x/total for x in inverse]
The basic idea is that a given machine is assigned an image strip whose width is inversely proportional to the time required to perform a speed test. Faster machines get wider strips, i.e. more of the workload, in the hope that all the machines will finish at once. The sum of the values in the profile list always equals 1.0, to cooperate with Blender's expectations about how strip widths are assigned.
Speed Test 1
The premise of Speed Test 1 is that, if machine speed were the only factor, a faster machine is given proportionally more work, so the generated profile would assure that all the machines finish at once. Speed Test 1 is a good compromise choice if many different single-frame images are to be rendered on your network, because over a large set of typical images the faster machines will be given more work.
Speed Test 2
The simple speed test doesn't take image complexity into account — the varying spatial complexity of the image is as important as the speed of the networked machines. So in Speed Test 2, the test is performed using a small version of the image to be rendered. This may sound overly complicated, but for an image that may require hours of rendering time, a preliminary 30-second speed test that assigns machine workloads based on both machine speed and image complexity is a better approach than one that disregards the image's contents.
In Speed Test 2, the speed-test image strips have equal width, as shown in Figure 3 above, and the same profile generation code is used. Because it takes the image's content into account, this speed test produces a more accurate profile (meaning one that tries to produce equal render times), but it can't create a perfect outcome, for a subtle reason (click here for that reason).
Speed ProfilingFor a speed profiler that assigns resources based purely on machine speed, a very accurate profile can be created, because the relationship between time and machine speed is linear — a machine assigned twice as much work will take twice as much time. Such a profile assures that all the machines will finish at once.
But for a profiling scheme that assigns more or less image content based on a preliminary test using an actual image, the relationship isn't linear, because the image isn't uniform — an image strip that's twice as wide doesn't necessarily require twice as much time to draw.
In Speed Test 1, machines are assigned work based on their raw speed, with an underlying assumption that the relationship is linear — twice as much image requires twice as much time. That would only be true if the image were perfectly uniform, which, although true for a large set of images, is almost never true for any specific image. Speed Test 2 takes a specific image into account by assigning an actual image rendering task to each tested machine. This is an improvement over Speed Test 1, but it's by no means perfect, because an image strip that's adjusted to be 50% wider doesn't necessarily require 50% more rendering time (it could be more or less than 50%).During the development of this program I finally realized that the only accurate way to assign workloads would be to repeatedly assign rendering tasks, use the results to incrementally adjust the width of the strips, and repeat the process until the results were acceptable and the machines all finished their tasks at once. But because the relationship between image strip width and rendering time is nonlinear, this effort failed spectacularly (it would also have required too much time to be practical).
Linear Algebra
This is an example of a problem normally solved using linear algebra, a rich mathematical field that can be used to produce efficient optimizations for problems like this one. But the basic premise of the field is that the equations must be linear — there must be a linear relationship between arguments and results. Unfortunately, this rendering task doesn't have that essential property. I saw cases where, for a given accuracy goal, the optimization task would have gone on forever because the image's content was sufficiently complex to break any assumptions I had made about speed versus complexity.Blender Interface
Blender has a python interface and API, and this is how external Python programs like mine can divide workloads between machines. Once the preliminary work described above has been completed and we have a reasonably reliable network speed profile, my program can start serious work, using this process:
- The user submits a Blender definition file to my program in a command-line "shell session":
$ blender_network_render.py filename.blend- Once launched, my program distributes the submitted Blender definition file, plus a small Python program that defines a given network machine's detailed task, across the network to each participating machine.
- Having set up for the render, my program creates as many concurrent threads as there are machines available, launches an instance of Blender on each concurrent thread, then monitors the process.
- In each thread a copy of the Blender definition file, and a small Python control program that defines the size and shape of the strip to be rendered, are submitted to Blender for execution.
- At this stage each machine renders a subset of the image as explained in the section above.
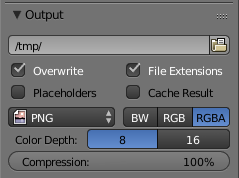
- When all the machines have completed their parts of the render, my program collects all the strips and knits them together into a final image. This method's required image format (click here to see the Blender entry) — transparent PNG with either 8 or 16-bit color depth (with color specifier RGBA) — makes possible seamless image assembly.
This method's required
image format
- The finished graphic is written to the directory in which the blender_network_render program is running and where the Blender definition file is located.
- All the temporary scripts and image strips are deleted as the program finishes.
Outcome
In tests with large images, assuming a network of more or less equal-speed machines, the rendering time improvement roughly increases proportional to the number of available machines. For small or uncomplicated images, the overhead time required to distribute and collect the network resources prevents a linear increase in speed as a function of the number of participating machines, but the speed improvement is still noteworthy and welcome. This method is most useful for large, complex images such as I have been creating recently, i.e. large, spherical, 360°, as well as binocular three-dimensional (the latter of which by itself doubles the image's size).
Adaptable
For a network of machines with varying speeds and ability, my program can produce a custom speed profile to maximize the efficiency with which different-speed machines work together, details above. On my home network I have three fast, modern machines and one older four-core machine that is substantially slower than the others. After generating a speed profile, my program assigns the slow machine a smaller percentage of the image, so it contributes to the render without slowing down the overall render time.
Now we can move on to installing the program and its dependencies.
Remember that the following installs must be performed on each participating network machine, not just the controller machine.
Install blender_network_render.py
First, download the blender_network_render.py program (right-click this link and choose "Save link as..."), mark it as executable, and put a copy in /usr/local/bin (this step makes the program accessible from anywhere on your system).
The details: after downloading the program into your home directory, proceed this way in a shell session:
$ chmod +x blender_network_render.py
$ sudo cp blender_network_render.py /usr/local/bin
The first instruction above makes the Python script executable. The second makes a copy to a location that makes the program visible in any directory the user chooses.
Install Dependencies
Install these packages from the standard repositories:
- Blender (the primary program)
- Python 3 (probably already present)
- ImageMagick (for image manipulation)
- Avahi (for Zeroconf)
- OpenSSH (Secure Shell)
On Linux, installing these packages is simplicity itself. For Debian-based Linux distributions like Ubuntu and Mint, a typical installation command would be:
$ sudo apt-get -y install blender python3 imagemagick \
       avahi-utils openssh-client openssh-server
Some of these packages will already be installed, Python in particular, and possibly OpenSSH as well.
Beyond package installation, on some Linux distributions it may be necessary to activate the SSH server:
$ sudo systemctl enable sshd
$ sudo systemctl start sshd
Also we should check that the SSH client has an encryption key available (this key-generation step may have been performed automatically by the installer):
$ ssh-keygen -t ed25519 -N ''In response to the above command, the
ssh-keygenprogram will look for an existing key and if one exists, will ask if you want to overwrite it. If a key already exists, say no, don't overwrite an existing key. Otherwise the program will create a new key, which is required to securely communicate with other SSH-equipped machines.One could use a package manager with a graphical interface to locate and install these packages, but that's more complicated. In any case users of my program should become accustomed to working in a command shell (or terminal sesson), because that's the most efficient way to run network renders.
Initial Settings and Configuration
If all the above steps have been carried out correctly, we should be able to run the Blender network render program. Here are some preliminary tests and setup actions:
- Make sure the program is accessible. Open a shell session, type "blender_network_render.py" and press Enter. You should see:
Usage: -m [list of participating machine URIs] define participating machines
       -f find local-network Blender-equipped machines using Avahi/Zeroconf (Linux only)
       -l locate system applications and resources
       -s [Blender filename, integer or use default of 5e+08] network speed test
       -r reset machine speed allocations to default values
       -c copy SSH identities to network machines
       -t test SSH login on participating machines
       -q quiet
       Blender script(s)
If the above test fails, for example if the system cannot locate or run the program, make sure that a copy of the program has been placed in /usr/local/bin and that Python 3 was installed.
Now type "blender_network_render.py -l" (that's a lowercase L). You should see:
Located resource "convert" = "/usr/bin/convert" Located resource "ssh" = "/usr/bin/ssh" Located resource "cp" = "/bin/cp" Located resource "blender" = "/usr/local/bin/blender" Located resource "rm" = "/bin/rm" Located resource "scp" = "/usr/bin/scp" Writing system configuration file.- The above is an important test for the presence of required resources. If any are missing, go back and repeat the steps to install that component.
Machine Identification and Public-key Authentication
No-Password Logons
Now to configure the Secure Shell public-key feature. In this step we validate the host machine to the network machines. The host is the machine that will control the rendering process, so it must be able to easily communicate with the other machines. This step allows convenient communication without having to enter passwords for each action.
- Make a list of names of machines that will be participating in renders. Remember that each network name is the machine's host name plus ".local", to take advantage of the Zeroconf networking protocol.
- Choose which machine will be the host/controller.
- From the host machine, issue this command to each of the machines including the host:
$ ssh-copy-id (machine-host-name).local- The above will require as many password entries as there are participating machines, but if it's done correctly, this will be the last time you have to enter passwords. The test of success is that you can log onto each of the participating machines without entering a password (a test you can perform using the program's "-t" option).
Network Machine List
At this point we can submit to the program a list of machine names for network rendering:$ blender_network_render.py -m (hostname1).local (hostname2).local (hostname3).local ...The above submits a manually compiled list of participating network machines. But if the public-key authentication step above has been completed successfully, and if each machine can be accessed without requiring a password, there's an easier way to find and configure network machines:
$ blender_network_render.py -fThis command uses the Avahi/Zeroconf protocol to automatically locate machines and verify that they have Blender installed. This is the preferred way to configure a Blender render farm because if new machines have been added or a particular machine is inoperative or turned off, this method takes those factors into account.
Remember that the following installs must be performed on each participating network machine, not just the controller machine.
Install blender_network_render.py
Download the blender_network_render.py program (right-click this link and choose "Save link as..."). When the file has been downloaded, make a copy in the C:\Windows directory. This will make the program accessible everywhere in the system, which means you can use it in any directory containing Blender definition files. The details:
- In a File Explorer, right-click the blender_network_render.py program file, select "Copy".
- Navigate to the C:\Windows directory, right-click and select "Paste".
- A dialog will appear telling you that administrator authority is required to make a copy in C:\Windows. Grant it.
Install Dependencies
Now for the dependencies. Need I say that installing the required resources on Windows is way more complicated than on Linux? The needed list of packages is the same as above --
- Blender (the primary program)
- Python 3
- ImageMagick (for image manipulation)
- Avahi (for Zeroconf) (optional on Windows)
- OpenSSH (Secure Shell)
-- but because Windows doesn't have anything resembling a package manager or organized software archive (apart from software that Microsoft owns and controls), locating and installing software is not unlike traipsing through government offices in search of the perfect bureaucrat. Having said that, here we go:
Install Blender
- Go to the Blender website and choose a version and a download server. Most Windows users will want to install the .MSI package — it's easiest to use. Make sure you choose the right bit width — download the 64-bit version on most modern machines.
- Open a Windows File Explorer, navigate to the downloads directory, locate a recently-dated package with "Blender" in its name and click it. Make sure to accept the installation defaults, don't get creative about program placement (if Blender isn't located in a subdirectory under "C:\Program Files", my program won't be able to find it when it needs to).
Install Python 3
- Go to the Python Windows download page and choose the most recent Python version (not the 2.7 version). For most modern 64-bit machines, click the link with this text: "Download Windows x86-64 executable installer" (I would provide an actual link, but the Python version will change in the future, so any particular link will not stay current).
- Open a Windows File Explorer, navigate to the downloads directory, locate a new download with "Python" in its name and click it. During the installation, be sure to select the option that includes Python in the system path — this assures that you can access Python from any command shell.
- To test the installation, open a shell session (Windows terminology: command window) and type "python --version". The response should not be "'python' is not recognized as an internal or external command, operable program or batch file." If it is, something went wrong with the installation, possibly the part where the installer asked if you want Python included in the system path. If so, uninstall and reinstall Python.
Install ImageMagick
- Go to the ImageMagick Windows download list and in most cases choose the first download link (Don't try to choose more specifically without some expertise at your disposal).
- Open a Windows File Explorer, navigate to the downloads directory and locate a recent download with "Imagemagick" in its name, and click it. This installation is relatively benign, because Imagemagick always adds its directory to the system path.
- To test the availability of Imagemagick, open a shell session (Windows terminology: command window) and type "magick --version". As above, if the system cannot find the program, something went wrong — start over.
Install Avahi/Zeroconf (optional on Windows)
As it turns out, this efficient, clever network auto-configuration scheme is not included with Windows as it is with Linux and Macintosh. The reason should be obvious — Microsoft doesn't own it, they can't sell it to you, and it makes using a computer much easier, all facts that work against Microsoft's corporate interests and outlook. But you can install it yourself, and after having done so, all your network machines — both Windows and Linux — become visible and easily accessible.
There is no simple Windows install package for Zeroconf as there is on other platforms, but it's available bundled in an Apple package called "ITunes." You can get Zeroconf without installing ITunes (which would be a bad idea). Here's how to proceed:
- First, if you haven't already done so, download and install 7Zip (follow the link and choose a suitable package).
- Now go to the Apple ITunes download page and download but don't install ITunes (also disable Apple's sleazy attempt to spam you by canceling two check-boxes at the top of the page).
- Navigate to your downloads directory, locate the ITunes install package (usually named something like ITunes ... Setup.exe), right-click it, and choose "7Zip ... Open Archive".
- Having opened the archive, you will see something like this.
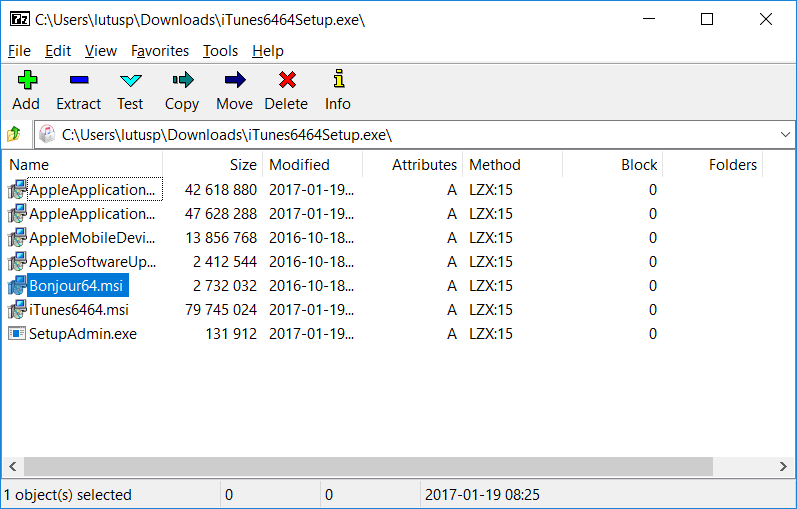
- The item of interest — Bonjour64.msi — is highlighted in the image. Right-click it, choose "Copy to ..." and select your downloads directory.
- Close the 7Zip dialog and install Bonjour64.msi from your downloads directory.
- Congratulations! Assuming you perform this install on each of your machines, you now have a painless way to communicate with all of them.
- Using Zeroconf, each of your machines (Windows, Linux, Macintosh, etc.) is accessible using the name (hostname).local. There's no need to remember IP addresses or use network static addressing.
- One more thing. Like all worthwhile ideas, Zeroconf is free.
The reason Zeroconf is optional on Windows is because if all your machines are running Windows, they can all be accessed using their hostnames (i.e. using Microsoft's NetBIOS network communication method). But Zeroconf is very useful in a mixed network environment, especially an extended one that includes Android devices (my free Android app SSHelper supports Zeroconf).
Install OpenSSH for Windows
I've saved the worst for last. Based on how difficult it is to install OpenSSH, an advanced, widely accepted and secure network communication protocol, on Windows, one would think Microsoft wants to destroy everything except their way of doing things. But that couldn't be true, could it? Wouldn't educated people find out and reject Microsoft's entire strategy? But I digress, here we go:
- I originally had created a manual, step-by-step procedure derived from this page for installing OpenSSH on Windows, but it was truly baroque in complexity, so I wrote a PowerShell script that does it for you.
- Right-click this link and save its content on your system as install-win32-openssh.ps1.
- Locate the downloaded file, right-click it, and choose "Run with Powershell."
- Unless much has changed since this article was written, the install should proceed seamlessly.
- While the script is running, you may be asked to enter a "passphrase" for an automatically generated SSH encryption key. For most people, pressing Enter with no passphrase is the right choice.
- To verify that this installation step has succeeded, open a shell session (command window) and type "ssh". You should see this:
usage: ssh [-1246AaCfGgKkMNnqsTtVvXxYy] [-b bind_address] [-c cipher_spec]
           [-D [bind_address:]port] [-E log_file] [-e escape_char]
           [-F configfile] [-I pkcs11] [-i identity_file]
           [-J [user@]host[:port]] [-L address] [-l login_name] [-m mac_spec]
           [-O ctl_cmd] [-o option] [-p port] [-Q query_option] [-R address]
           [-S ctl_path] [-W host:port] [-w local_tun[:remote_tun]]
           [user@]hostname [command]
Remember that, in Windows and unlike linux, a system specifier in the form "username@hostname" is always required, to avoid endless authentication problems. We'll touch on this topic again.
Allow PowerShell to host the program
In most cases the blender_network_render.py program is run from a shell session, and many people prefer a PowerShell shell session over the older cmd.exe environment. But for an interactive Python program to be able to print its prompts and results in PowerShell, a system-wide environmental variable needs to be edited (this change ought to be automatically performed by the above Win32-OpenSSH installation script, so this section is only precautionary):
- Open the Control Panel.
- Select the System icon.
- Click Advanced System Settings.
- Click the Advanced tab.
- Choose the Environment Variables button at the lower right.
- In the System Variables window, select PATHEXT so it's highlighted.
- Click "Edit".
- If it is not already present somewhere in the displayed text, add ";.PY" to the end of the string.
- Exit by clicking a bunch of "OK" buttons.
- Close and reopen any Powershell instances that may be running.
Now we can use PowerShell instead of cmd.exe for Blender render management.
Initial Settings and Configuration
If all the above steps have been carried out correctly, we should be able to run the Blender network render program in either PowerShell or the older command environment — PowerShell is preferred. Here are some preliminary tests and setup actions:
- Make sure the program is accessible. Open a PowerShell session, type "blender_network_render.py" and press Enter. You should see:
Usage: -m [list of participating machine URIs] define participating machines
       -l locate system applications and resources
       -s [Blender filename, integer or use default of 5e+08] network speed test
       -r reset machine speed allocations to default values
       -c copy SSH identities to network machines
       -t test SSH login on participating machines
       -q quiet
       Blender script(s)
If the above test fails, for example if the system cannot locate or run the program, make sure that a copy has been placed in C:\Windows, and that Python 3 was installed.
- Now type "blender_network_render.py -l" (that's a lowercase L). You should see:
Located resource "convert" = "C:\Program Files\ImageMagick-7.0.5-Q16\magick.exe" Located resource "rm" = "del" Located resource "ssh" = "C:\Program Files\OpenSSH-Win64\ssh.exe" Located resource "scp" = "C:\Program Files\OpenSSH-Win64\scp.exe" Located resource "blender" = "C:\Program Files\Blender Foundation\Blender\blender.exe" Located resource "cp" = "copy" Writing system configuration file.- The above is an important test of the presence of required resources. If any are missing, repeat the above steps to install that component.
Machine Identification and Public-key Authentication
Now to tell the program the names of your machines and configure the Secure Shell public-key feature. In these steps we identify network machines and validate the host machine to the network machines.
The host is the machine that will control the rendering process, so it must be able to easily communicate with the other machines. This step allows convenient communication without having to enter passwords for each action. Because this method is based on Secure Shell, this also allows use of the program across the Internet, not just locally.
- Make a list of the names of machines that will be participating in renders. On Windows, to avoid authentication problems, this host list must have a particular form: username@(hostname1), username@(hostname2), etc.. Be sure to always include a valid username (ideally a single username shared among all the machines), as shown, with each machine name.
- If there's any doubt about the names of your networked machines, just visit each machine, open a shell session, and enter "hostname". The system will print the machine's name.
- Now choose which machine will be the host/controller.
- From the host machine, open a PowerShell and carry out these commands:
> blender_network_render.py -m username@(machinename1) username@(machinename2) ...This important step configures the program with the names of all the participating machines. Remember to include valid usernames with each machine name.
Now to set up public-key authentication:
> blender_network_render.py -c- The above command automatically distributes public keys to the machines defined above. This step will require as many password entries as there are participating machines, but if it's done correctly, this will be the last time you have to enter passwords. The test of success is that you can log onto each of the participating machines without entering a password (a test you can perform using the program's "-t" option).
At this point the program should be installed and its basic operation verified. So to get things started, let's create a simple test image and render it on the network. (This section's instructions should work the same on both Linux and Windows.)
- Open a shell session (Windows: Command Prompt or PowerShell, the latter preferred) and navigate to a suitable directory for creating and rendering Blender images.
- With the shell session open and available, run Blender and create a simple, fast-rendering test image. Save the test image Blender file in the directory you've chosen for this task.
- Returning now to the shell session, enter this:
> blender_network_render.py (blender file name)- If you have chosen PowerShell for your work environment, you already have a big advantage — it should be possible to enter just a few characters of the program's name followed by the tab key, which should complete the entry for you. Then enter the Blender file name, which (if it's in the same directory) also can be simplified with the tab key.
- After the above entries, when you press Enter, the program will commence rendering. The program will break the task into as many strips as there are available machines, cause them to be rendered on separate machines, and will reassemble the result in a final image in the same directory.
- If the resulting image isn't complete or has black vertical strips where image data should be, make sure you're using the correct graphic format (8 or 16-bit color depth, but must be RGBA).
This method's required
image format
After a successful first render, these steps can be taken:
- Multiple image file names can be entered on the command line and will be rendered in sequence.
- Blender definition file names that include spaces must be quoted:
> blender_network_render.py "first name.blend" "second name.blend"If the networked machines are completing their tasks at widely differing times (which has the effect of slowing down the overall render time), re-perform one of the the speed tests described earlier:
- For a wide selection of images with different contents, use Speed Test 1:
> blender_network_render.py -sIf the speed test run take too much or too little time, enter a number after "-s" to change the test's duration. The default value is 5e08, meaning 5 * 108 repetitions of a typical floating-point processing task, suitable for a typical modern computer.
- For a complex image that requires hours of rendering time and that is the focus of your efforts, it may be better to perform Speed test 2 instead:
Create a separate version of the complex image definition file that specifies a smaller image size, one that can render in a few minutes, and submit it to the program like this:
> blender_network_render.py -s (small test image filename).blendThe above will perform a render and use the time results to revise the machine time allocations, optimized specifically for this image. After this small-sample speed run, the longer renders will tend to more equally distribute the workload among available network resources.
This network-render approach may be desirable to speed up renders even for relatively simple images, now that the Cycles rendering engine is becoming the Blender default. The Cycles engine is much better than the prior renderer, but it requires more computer horsepower and time. Those with a refined aesthetic sense who naturally gravitate toward the Cycles engine will want to find more ways to speed up renders, and this program can help achieve that goal.
Again, for animations, a method already exists as a Blender add-on option, but for complex single images, especially the special 3D 360° images intended for VR headsets, this approach can speed things up significantly, especially so in an environment with many available networked macnines.
"Blender Network Render" is released under the GPL.
Click here to see/download a plain-text version of the Python source file (right-click the link and choose "Save as ..." or similar wording).
Here's a syntax-colored Python program listing:
1: #!/usr/bin/env python3 2: # -*- coding: utf-8 -*- 3: 4: # Version 1.0 2017.03.12 5: 6: # *************************************************************************** 7: # * Copyright (C) 2017, Paul Lutus * 8: # * * 9: # * This program is free software; you can redistribute it and/or modify * 10: # * it under the terms of the GNU General Public License as published by * 11: # * the Free Software Foundation; either version 2 of the License, or * 12: # * (at your option) any later version. * 13: # * * 14: # * This program is distributed in the hope that it will be useful, * 15: # * but WITHOUT ANY WARRANTY; without even the implied warranty of * 16: # * MERCHANTABILITY or FITNESS FOR A PARTICULAR PURPOSE. See the * 17: # * GNU General Public License for more details. * 18: # * * 19: # * You should have received a copy of the GNU General Public License * 20: # * along with this program; if not, write to the * 21: # * Free Software Foundation, Inc., * 22: # * 59 Temple Place - Suite 330, Boston, MA 02111-1307, USA. * 23: # *************************************************************************** 24: 25: import os 26: import sys 27: import re 28: import subprocess 29: import time 30: import glob 31: import tempfile 32: import threading 33: import socket 34: import platform 35: import signal 36: import ast 37: 38: class BlenderNetworkRender: 39: """ 40: This class creates parallel threads to render Blender images 41: on multiple processors/machines. 42: """ 43: 44: def __init__(self): 45: 46: self.debug = False 47: 48: self.verbose = True # more messages printed on console 49: 50: # for a longer but more accurate speed test, 51: # increase the size of this number either 52: # here or on the command line 53: 54: self.speed_test_repeat_count = 5e8 55: 56: # seconds between console updates during render 57: 58: self.time_delay = 5 59: 60: # windows_system flag, identifies a windows system, changes many things 61: 62: self.windows_system = re.search('(?i)windows', platform.system()) != None 63: 64: # used in resource searches 65: 66: if self.windows_system: 67: self.search_str = r'cd "C:\Program Files" && dir /b %s.exe /s' 68: else: 69: self.search_str = 'which %s' 70: 71: 72: self.call_suffix = ('> /dev/null 2>&1', '')[self.windows_system] 73: 74: self.null_file_handle = open(os.devnull, "w") 75: 76: self.running = True 77: 78: # trap Ctrl+C and other exit strategies 79: 80: signal.signal(signal.SIGINT, self.exit_handler) 81: signal.signal(signal.SIGTERM, self.exit_handler) 82: 83: self.hostname = socket.gethostname() 84: 85: self.temp_dir = tempfile.gettempdir() 86: 87: self.program_name = re.sub(r'(.*[/\\])?(.*)\..*', r'\2', sys.argv[0]) 88: 89: self.home_path = os.path.expanduser("~") 90: 91: self.init_file_path = '%s.ini' % os.path.join(self.home_path, '.' + self.program_name) 92: 93: self.python_temp_path = os.path.join(self.temp_dir, 'blender_temp.py') 94: self.blender_temp_path = os.path.join(self.temp_dir, 'blender_temp.blend') 95: self.graphic_temp_path = os.path.join(self.temp_dir, 'blender_temp.png') 96: 97: self.speed_test = False 98: 99: self.config = { 100: 'machines' : [], 101: 'allocations' : [], 102: 'coms' : {'blender':'', 'rm':'', 'cp':'', 'ssh':'', 'scp':'', 'convert':''} 103: } 104: 105: # Python time test script 106: # a simple test like this is carried out on only one core 107: # so divide the test count by the number of cores 108: 109: self.speed_test_script = """ 110: import multiprocessing, math 111: 112: count = %d // multiprocessing.cpu_count() 113: 114: for n in range(count): 115: x = math.sqrt(2) 116: """ 117: 118: # Blender Python render script 119: 120: self.render_script = """ 121: import bpy, sys 122: n = sys.argv.index('--') 123: bcsr = bpy.context.scene.render 124: bcsr.use_border = True 125: bcsr.border_min_x = float(sys.argv[n+1]) 126: bcsr.border_max_x = float(sys.argv[n+2]) 127: bcsr.border_min_y = 0 128: bcsr.border_max_y = 1 129: bcsr.filepath = sys.argv[n+3] 130: bpy.ops.render.render(write_still=True) 131: """ 132: 133: self.start_time = {} 134: self.duration_time = {} 135: 136: # end of __init__() 137: 138: @staticmethod 139: def option_function(array, index): 140: """ 141: allow SSH relaxed security, for testing only 142: """ 143: for n, item in enumerate(('-o', 'StrictHostKeyChecking=no')): 144: array.insert(index+n, item) 145: 146: def verbose_print(self, s): 147: if self.verbose: 148: print(s) 149: 150: @staticmethod 151: def write_file(path, data): 152: with open(path, 'w') as f: 153: f.write(data) 154: 155: @staticmethod 156: def read_file(path): 157: with open(path) as f: 158: return f.read() 159: 160: # read and write program initialization file 161: 162: def write_config_file(self, prompt=False): 163: """ 164: write plain-text configuration file 165: as a string-formatted dict 166: """ 167: if prompt: 168: self.verbose_print('Writing system configuration file.') 169: self.write_file(self.init_file_path, '%s\n' % str(self.config)) 170: 171: def read_config_file(self, prompt=False): 172: """ 173: read plain-text configuration file 174: and convert into a dict 175: """ 176: if os.path.exists(self.init_file_path): 177: if prompt: 178: self.verbose_print('Reading system configuration file.') 179: data = self.read_file(self.init_file_path) 180: self.config = ast.literal_eval(data) 181: 182: @staticmethod 183: def sys_write(s): 184: """ 185: a convenient way to emit 186: characters without linefeeds 187: and make them visible immediately 188: """ 189: sys.stdout.write(s) 190: sys.stdout.flush() 191: 192: def test_ssh_login(self): 193: """ 194: perform SSH login on a list of machines 195: as a test of public-key authentication 196: """ 197: for machine in self.config['machines']: 198: com = [ 199: self.config['coms']['ssh'], 200: machine, 201: 'echo', 202: '%s: OK.' % machine, 203: ] 204: subprocess.call(com, True) 205: 206: 207: def available(self, s, machine=None): 208: """ 209: test for existence of a named program 210: either locally or on a network machine 211: """ 212: if machine is not None: 213: com = '%s %s %s %s' % \ 214: ( 215: self.config['coms']['ssh'], 216: machine, 217: self.search_str % s, 218: self.call_suffix 219: ) 220: else: 221: com = '%s %s' % (self.search_str % s, self.call_suffix) 222: (result, _) = subprocess.getstatusoutput(com) 223: return result == 0 224: 225: 226: @staticmethod 227: def sec_to_hms(t): 228: """ 229: convert floating-point seconds 230: into d hh:mm:ss.ss string 231: """ 232: sign = (' ', '-')[t < 0] 233: t = abs(t) 234: sec = t % 60 235: t //= 60 236: minute = t % 60 237: t //= 60 238: hour = t % 24 239: day = t // 24 240: return '%s%dd %02d:%02d:%05.2f' % (sign, day, hour, minute, sec) 241: 242: def list_machine_times(self): 243: """ 244: display previously computed 245: network machine time allocations 246: """ 247: for n, machine in enumerate(self.config['machines']): 248: print( 249: ' %-30s : %.4f' % 250: ( 251: machine, 252: self.config['allocations'][n]) 253: ) 254: 255: def system_call(self, com, use_shell=False): 256: """ 257: use subprocess.call() to execute a system program 258: and return status (0 = no error) 259: """ 260: if not self.debug: 261: result = subprocess.call( 262: com, 263: stdout=self.null_file_handle, 264: stderr=self.null_file_handle, 265: shell=use_shell 266: ) 267: if result != 0: 268: print('Error executing system call %s.' % com[0]) 269: print('To learn more, run with debug flag "-d".') 270: else: 271: print('*** system call: [%s]' % com) 272: result = subprocess.call( 273: com, 274: shell=use_shell 275: ) 276: print('*** call outcome: %s error' % ('no', '')[result != 0]) 277: return result 278: 279: @staticmethod 280: def normalize_list(lst): 281: """ 282: normalize a numeric list so sum of all values = 1 283: """ 284: total = sum(lst) 285: return [x/total for x in lst] 286: 287: # manage network machine time allocations 288: 289: def reset_allocations(self): 290: """ 291: set default machine allocations so each 292: machine gets 1/n of the processing time 293: """ 294: size = len(self.config['machines']) 295: self.config['allocations'] = [1/size for m in self.config['machines']] 296: self.verbose_print('Machine speed allocations set to defaults.') 297: 298: def test_allocation_consistency(self): 299: """ 300: make sure the lists of machines and allocations 301: are the same size otherwize reset the allocations 302: """ 303: if len(self.config['allocations']) != len(self.config['machines']): 304: self.reset_allocations() 305: 306: def remove_temps(self): 307: """ 308: remove temporary files from remote and local machines 309: """ 310: for machine in self.config['machines']: 311: com = [ 312: self.config['coms']['ssh'], 313: machine, 314: self.config['coms']['rm'], 315: self.python_temp_path, 316: self.blender_temp_path, 317: self.graphic_temp_path 318: ] 319: # option_function(com, 1) 320: try: 321: self.system_call(com) 322: except: 323: None 324: com = [ 325: self.config['coms']['rm'], 326: os.path.join(self.temp_dir, 'blender_strip0*.png') 327: ] 328: try: 329: self.system_call(com, True) 330: except: 331: None 332: 333: 334: def find_local_machines(self): 335: """ 336: use Avahi/Zeroconf to locate Blender-equipped network servers 337: this only works on Linux at the moment 338: """ 339: self.sys_write('Searching local network for Blender-equipped machines ...') 340: found = [] 341: if not self.available('avahi-browse'): 342: print('\nTo use this feature, your system must have Avahi/Zeroconf installed.') 343: else: 344: data = subprocess.getoutput('avahi-browse _ssh._tcp -tr') 345: for line in data.split('\n'): 346: self.sys_write('.') 347: if re.search('hostname = ', line): 348: sysname = re.sub(r'(?i).*hostname.*?\[(.*?)\].*', r'\1', line) 349: # if the system has blender installed 350: if self.available('blender', sysname): 351: found.append(sysname) 352: # remove duplicates and sort 353: found = sorted(list(set(found))) 354: print('\nLocated machines:') 355: for machine in found: 356: print(' %s' % machine) 357: self.config['machines'] = found 358: self.reset_allocations() 359: self.write_config_file(True) 360: 361: def locate_system_resources(self, force=False): 362: """ 363: create a dict of generic command names 364: and platform-dependent definitions 365: """ 366: changed = False 367: for name in self.config['coms']: 368: if len(self.config['coms'][name]) == 0 or force: 369: changed = True 370: target = name 371: output = None 372: status = 0 373: # some Windows programs have different names 374: if self.windows_system: 375: # on Windows, 'rm' = 'del' builtin 376: if name == 'rm': 377: output = 'del' 378: # on Windows, 'cp = 'copy' builtin 379: if name == 'cp': 380: output = 'copy' 381: # the ImageMagick 'convert' program has a different name on Windows 382: if name == 'convert': 383: target = 'magick' 384: if output is None: 385: (status, output) = subprocess.getstatusoutput(self.search_str % target) 386: if status == 0: 387: self.verbose_print('Located resource "%s" = "%s"' % (name, output)) 388: self.config['coms'][name] = output 389: else: 390: self.verbose_print('Error: cannot locate resource "%s"' % name) 391: if changed: 392: self.write_config_file(True) 393: 394: def copy_identities(self): 395: """ 396: copy Secure Shell identities to local network machines 397: for use in public key authentication, using different 398: methods for Linux and Windows 399: """ 400: path = os.path.join(self.home_path, '.ssh') 401: if not os.path.exists(path): 402: print('This system is not configured for Secure Shell.') 403: return 404: else: 405: done = False 406: while not done: 407: lst = os.listdir(path) 408: lst = [re.sub(r'\.pub', '', s) for s in lst if re.search(r'\.pub$', s)] 409: if lst is None or len(lst) == 0: 410: print('This system has no defined Secure Shell keys.') 411: return 412: print('Choose identity key(s):') 413: n = 0 414: for n, item in enumerate(lst): 415: print(' %d: %s' % (n, item)) 416: print(' %d: All of them' % (n+1)) 417: result = input("Select:") 418: try: 419: x = int(result) 420: assert x < len(lst) + 1 and x >= 0 421: done = True 422: except: 423: print('Please enter a number in the range (0-%d).' % (len(lst))) 424: continue 425: if x == len(lst): 426: idx = range(0, x) 427: else: 428: idx = range(x, x+1) 429: for n in idx: 430: kpath = os.path.join(path, lst[n] + '.pub') 431: data = self.read_file(kpath).strip() 432: print('Processing key %d : %s' % (n, lst[n])) 433: auth = os.path.join(path, 'authorized_keys') 434: for machine in self.config['machines']: 435: print(' Writing to %s ...' % machine) 436: if self.windows_system: 437: com = [ 438: self.config['coms']['ssh'], 439: machine, 440: '"', 441: 'powershell write-host \"%s`r`n\" >> \"%s\"' % (data, auth), 442: '"', 443: ] 444: self.system_call(com) 445: else: 446: com = [ 447: self.config['coms']['ssh'], 448: machine, 449: 'echo', 450: '"%s"' % data, 451: '>>', 452: auth 453: ] 454: self.system_call(com) 455: 456: 457: # begin script processing routines 458: 459: 460: def threaded_call( 461: self, machine, 462: blender_script_path, 463: apos, bpos 464: ): 465: """ 466: launched in a thread, this function 467: runs an instance of Blender on a network machine 468: as one of a set of a concurrent threads 469: """ 470: com1 = [ 471: '%s' % self.config['coms']['ssh'], 472: #'-v', # testing only 473: '%s' % machine 474: ] 475: com2 = [ 476: '%s' % self.config['coms']['blender'], 477: '--background' 478: ] 479: if len(blender_script_path) > 0: 480: com2 += ['%s' % blender_script_path] 481: com2 += [ 482: '--python', 483: '%s' % self.python_temp_path, 484: # '--' prevents blender from reading 485: # more arguments from the command line 486: '--', 487: # strip start and end numerical values 488: '%.4f' % apos, '%.4f' % bpos, 489: '%s' % self.graphic_temp_path 490: ] 491: # option_function(com1, 1) 492: if self.windows_system: 493: for n, item in enumerate(com2): 494: com2[n] = '\"' + item + '\"' 495: com2 = ['"'] + com2 + ['"'] 496: com = com1 + com2 497: self.start_time[machine] = time.time() 498: self.system_call(com) 499: self.duration_time[machine] = time.time() - self.start_time[machine] 500: 501: def launch_threads(self, blender_script_path, blender_string): 502: """ 503: create a network thread for each participating machine 504: """ 505: apos = 0 506: for n, machine in enumerate(self.config['machines']): 507: bpos = apos + self.config['allocations'][n] 508: self.verbose_print( 509: 'Rendering strip %d of %s on %s ...' 510: % (n, blender_string, machine) 511: ) 512: if re.search(self.hostname, machine) is None: 513: com = [ 514: self.config['coms']['scp'], 515: self.python_temp_path, 516: self.blender_temp_path, 517: '%s:%s/' % (machine, self.temp_dir) 518: ] 519: # option_function(com, 1) 520: self.system_call(com) 521: call_args = ( 522: machine, 523: blender_script_path, 524: apos, bpos 525: ) 526: # start network concurrent thread for one image strip 527: thread = threading.Thread( 528: target=self.threaded_call, 529: args=call_args 530: ) 531: thread.start() 532: apos = bpos 533: 534: def monitor_renders(self, process_start, blender_string): 535: """ 536: monitor running threads for completion 537: which is signaled by the machine's presence 538: in self.duration_time[macnine] 539: """ 540: busy = True 541: count = 0 542: while busy and self.running: 543: busy = False 544: active = [] 545: for machine in self.config['machines']: 546: # an entry in "duration_time" signals completion 547: if machine not in self.duration_time: 548: busy = True 549: active.append(machine) 550: # if some mechines are still rendering 551: if len(active) > 0 and count % self.time_delay == 0: 552: time_str = self.sec_to_hms(time.time() - process_start) 553: self.verbose_print('%s : %s : %s' % (time_str, blender_string, ', '.join(active))) 554: time.sleep(1) 555: count += 1 556: 557: def create_result_image(self, total, blender_name): 558: """ 559: combine generated image strips and create output image 560: """ 561: size = len(self.config['machines']) 562: if self.verbose: 563: # get average render time 564: mean = total / size 565: print('Network Rendering Times:') 566: for machine in self.config['machines']: 567: duration = self.duration_time[machine] 568: delta = (duration - mean) / mean 569: print( 570: ' %-30s : %s (deviation from mean %+7.2f%%)' 571: % (machine, self.sec_to_hms(duration), delta * 100) 572: ) 573: 574: # copy image strips to local machine 575: image_paths = [] 576: for n, machine in enumerate(self.config['machines']): 577: image_path = '%s/blender_strip%03d.png' % (self.temp_dir, n) 578: image_paths.append(image_path) 579: self.verbose_print('Copying strip %d from %s ...' % (n, machine)) 580: com = [ 581: self.config['coms']['scp'], 582: '%s:%s' % (machine, self.graphic_temp_path), 583: image_path 584: ] 585: # option_function(com, 1) 586: self.system_call(com) 587: 588: # combine strips -- this method requires that the 589: # Blender images be specified as RGBA PNG 590: self.verbose_print( 591: 'Creating result image "%s.png" from strips ...' 592: % (blender_name) 593: ) 594: com = [self.config['coms']['convert']] 595: com += image_paths 596: com += [ 597: '-flatten', 598: '%s.png' % blender_name 599: ] 600: self.system_call(com) 601: 602: 603: def process_script(self, blender_script): 604: """ 605: This is the main Blender definition file 606: processing function -- it reads the definition, 607: distributes it across the network, and 608: launches a thread for each machine 609: all of which run in parallel 610: """ 611: if len(self.config['machines']) == 0: 612: print('Error: no network machines defined.') 613: print('Use option \"-m\" to enter machine names.') 614: if not self.windows_system: 615: print('Or option \"-f\" to search for them.') 616: return 617: 618: if not self.running: 619: return 620: 621: # save the Python and Blender scripts as local files 622: 623: if self.speed_test and len(blender_script) == 0: 624: self.write_file(self.python_temp_path, self.speed_test_script % self.speed_test_repeat_count) 625: else: 626: self.write_file(self.python_temp_path, self.render_script) 627: if not self.windows_system: 628: os.system('chmod +x "%s"' % self.python_temp_path) 629: 630: if len(blender_script) > 0: 631: com = [ 632: self.config['coms']['cp'], 633: blender_script, 634: self.blender_temp_path 635: ] 636: self.system_call(com, self.windows_system) 637: blender_string = blender_script 638: else: 639: self.write_file(self.blender_temp_path, '') # write empty placeholder file 640: blender_string = '(network speed test)' 641: 642: if os.path.exists(self.init_file_path) and not self.speed_test: 643: self.verbose_print( 644: 'Machine speed allocations read from %s.' 645: % self.init_file_path 646: ) 647: else: 648: self.reset_allocations() 649: self.test_allocation_consistency() 650: 651: if self.verbose: 652: print('Current machine speed allocations:') 653: self.list_machine_times() 654: 655: blender_name = re.sub(r'(.*?)\.blend', r'\1', blender_script) 656: 657: process_start = time.time() 658: 659: self.start_time.clear() 660: self.duration_time.clear() 661: 662: # set up network render processes 663: 664: if len(blender_script) == 0: 665: blender_script_path = '' 666: else: 667: blender_script_path = self.blender_temp_path 668: 669: self.launch_threads(blender_script_path, blender_string) 670: 671: if not self.running: 672: return 673: 674: # now monitor the renders and wait for all to finish 675: 676: self.monitor_renders(process_start, blender_string) 677: 678: self.verbose_print('Done rendering strips for %s.' % blender_string) 679: total = sum(self.duration_time.values()) 680: 681: if not self.running: 682: return 683: 684: if self.speed_test: 685: # network speed test actions 686: allocation = [total / self.duration_time[machine] \ 687: for machine in self.config['machines']] 688: allocation = self.normalize_list(allocation) 689: self.config['allocations'] = allocation 690: if self.verbose: 691: print('Speed test machine running times:') 692: for machine in self.config['machines']: 693: print( 694: ' %-30s : %s' 695: % (machine, self.sec_to_hms(self.duration_time[machine])) 696: ) 697: print('Resulting machine speed allocations:') 698: self.list_machine_times() 699: self.write_config_file(True) 700: self.verbose_print( 701: 'Allocations saved to %s.' 702: % self.init_file_path 703: ) 704: 705: else: # not speed test 706: self.create_result_image(total, blender_name) 707: 708: process_end = time.time() 709: self.verbose_print( 710: 'File: %s : elapsed time: %s' 711: % (blender_string, self.sec_to_hms(process_end - process_start)) 712: ) 713: 714: # end script processing function 715: 716: def exit_handler(self, signum, frame): 717: """ 718: a program exit handler that (on Linux) 719: closes orphaned network processes 720: """ 721: #pylint: disable=unused-argument 722: if self.running: 723: self.running = False 724: if not self.windows_system: 725: print('\nUser interrupt.') 726: print('Terminating remote processes:') 727: for machine in self.config['machines']: 728: data = subprocess.getoutput( 729: 'ssh %s ps x' 730: % machine 731: ) 732: for line in data.split('\n'): 733: if re.search(self.python_temp_path, line): 734: arr = re.split(r'\s+', line.strip()) 735: print( 736: ' Terminating process %6s on %s' 737: % (arr[0], machine) 738: ) 739: os.system('ssh %s kill %s' % (machine, arr[0])) 740: else: 741: None 742: print('Exiting.') 743: quit() 744: 745: def show_help(self): 746: """ 747: provide the user with some sketchy information 748: about the program's options 749: """ 750: print('Usage: -m [list of participating machine URIs] define participating machines') 751: if not self.windows_system: 752: print( 753: ' -f find local-network Blender-equipped ' 754: + 'machines using Avahi/Zeroconf (Linux only)' 755: ) 756: print(' -l locate system applications and resources') 757: print( 758: ' -s [Blender filename, integer or use default of %.0e] network speed test' 759: % self.speed_test_repeat_count 760: ) 761: print(' -r reset machine speed allocations to default values') 762: print(' -c copy SSH identities to network machines') 763: print(' -t test SSH login on participating machines') 764: print(' -q quiet') 765: print(' Blender script(s)') 766: 767: 768: def main(self): 769: """ 770: default class entry point -- 771: read configutation file, 772: read and execute user commands 773: """ 774: if not self.available('ssh'): 775: print('Error: must have Secure Shell installed, exiting.') 776: quit() 777: 778: self.read_config_file() 779: 780: self.locate_system_resources() 781: 782: sys.argv.pop(0) # discard program path and name 783: 784: if len(sys.argv) == 0: 785: self.show_help() 786: quit() 787: 788: speed_numeric = False 789: 790: machine_names = False 791: 792: filenames = [] 793: 794: n = 0 795: while n < len(sys.argv): 796: arg = sys.argv[n] 797: if speed_numeric: 798: speed_numeric = False 799: try: 800: # this looks weird, but it's needed so one 801: # can enter '1e9' instead of nine zeros 802: self.speed_test_repeat_count = int(float(arg)) 803: except: 804: n -= 1 805: elif machine_names: 806: machine_names = False 807: names = [] 808: while n < len(sys.argv): 809: if sys.argv[n][0] == '-': 810: n -= 1 811: break 812: else: 813: names.append(sys.argv[n]) 814: n += 1 815: self.config['machines'] = names 816: print('Defined machines: %s' % names) 817: self.reset_allocations() 818: self.write_config_file() 819: elif arg == '-m': 820: machine_names = True 821: elif arg == '-f' and not self.windows_system: 822: self.find_local_machines() 823: elif arg == '-l': 824: self.locate_system_resources(True) 825: elif arg == '-s': 826: speed_numeric = True 827: self.speed_test = True 828: elif arg == '-r': 829: self.reset_allocations() 830: elif arg == '-c': 831: self.copy_identities() 832: elif arg == '-t': 833: self.test_ssh_login() 834: elif arg == '-d': 835: self.debug = True 836: elif arg == '-q': 837: self.verbose = False 838: else: 839: # windows doesn't expand wildcard arguments 840: gl_str = glob.glob(arg) 841: if len(gl_str) == 0: 842: filenames.append(arg) 843: else: 844: for item in gl_str: 845: filenames.append(item) 846: n += 1 847: 848: if len(filenames) == 0 and self.speed_test: 849: filenames = [''] 850: 851: if len(filenames) > 0: 852: 853: process_start = time.time() 854: 855: action = ('processing', '(network speed test)')[self.speed_test] 856: 857: for blender_script in filenames: 858: self.verbose_print( 859: '*** Begin %s %s ***' 860: % (action, blender_script) 861: ) 862: if len(blender_script) > 0 \ 863: and not os.path.exists(blender_script): 864: print( 865: 'Blender script %s doesn\'t exist, skipping.' 866: % blender_script 867: ) 868: else: 869: self.process_script(blender_script) 870: self.speed_test = False 871: self.verbose_print('*** End %s %s ***' % (action, blender_script)) 872: if not self.running: 873: break 874: 875: self.remove_temps() 876: 877: self.null_file_handle.close() 878: 879: process_end = time.time() 880: 881: delta_time = self.sec_to_hms(process_end - process_start) 882: 883: print('Total elapsed time: %s' % delta_time) 884: 885: # end of BlenderNetworkRender class definition 886: 887: # if not called as a module, then run main() 888: if __name__ == '__main__': 889: BlenderNetworkRender().main() 890:
| Home | | Computer Graphics | | | | Share This Page |