

 Share This Page
| Home | | Linux | | | | Share This Page |
How to automate router configuration using the router's Web interface
— P. Lutus — Message Page —
Copyright © 2017, P. Lutus
Most recent update:
(double-click any word to see its definition)
This article shows how to configure routers on local Linux networks in which the participating systems must communicate with each other as well as the Internet. It includes step-by-step instructions to automate the configuration process using the router's Web interface, but from a script rather than requiring user interactions.
Years ago I relied on a primitive scheme in which I assigned each system a static address and resolved local names with a hosts file (located in Linux at /etc/hosts), one copy per system. That system was quite a pain to maintain, and once Android and other wireless devices appeared on my network that method was no longer feasible, because such devices can't be directly assigned a static address.
Then for a few years I relied on Zeroconf, a slick name resolution scheme that doesn't require any explicit actions or maintenance to make it work. In the Zeroconf scheme, the assigned IP addresses aren't important because Zeroconf keeps track of them and maps system names to system IPs. But as it turns out, Zeroconf has a number of drawbacks in practice, including occasionally getting out of sync with the systems it's supposed to be resolving, and creating a lot of network traffic.
Along with the name resolution issue I ran experiments with wireless routers, some of which could be refitted with DD-WRT, a flexible router operating system based on Linux that offered a number of features to simplify the configuration task.
I eventually decided to abandon fancy routers with third-party firmware. I decided to change to a simple, economical off-the-shelf router that would behave the same in different environments and that could be easily replaced if need be. I have small networks on my boat and RV as well as home, different environments that had to behave the same — environments where a simple router would be ideal.
So I abandoned routers running DD-WRT and other specialized firmware in favor of ordinary routers with factory firmware that I could configure to support some simple name resolution method that didn't require Zeroconf. The most obvious approach would be to rely on DHCP address reservation (also known as "static DHCP assignment" and many other terms) in the router, along with a hosts file, one copy per system, containing the same information. "DHCP address reservation" is a scheme that all router brands support under different names — it maps system MACs to predetermined IP addresses.
The advantage to DHCP address reservation is that the router assigns the desired IP address based on the MAC of a system, which meant individual systems wouldn't have to be explicitly configured, an advantage for Android and other wireless devices, most of which can't be directly assigned a static address.
As I envisioned it, the center of the system would be an easily editable table that mapped system names, MACS and IP addresses, and a Python program that would read the database, generate the router's address reservation table and the system hosts file as well. I saw one problem — how to persuade a simple, off-the-shelf router to accept a table of reserved IP addresses without my having to manually enter the data.
Before I get into the details, let's see if this scheme meets your needs:
- If you have a relatively stable local network of wired and wireless systems that need to reliably communicate with each other as well as the Internet, then this scheme may serve your needs.
- If you have a local network in constant flux, with systems frequently arriving and departing, all of which must communicate with each other, you would be better off with Zeroconf or another dynamic IP resolution scheme.
- If you have a network in which local systems don't need to communicate with each other, only the Internet, then ordinary DHCP, the default scheme used by routers with no changes, will serve your needs.
The router in this example is a TP-LINK Archer C5, but most inexpensive routers should be compatible with this method. Most such routers have relatively simple authentication schemes and are therefore accessible to automated configuration methods by way of their Web interfaces.
This section shows the overall architecture of the name/MAC/address assignment/resolution system.
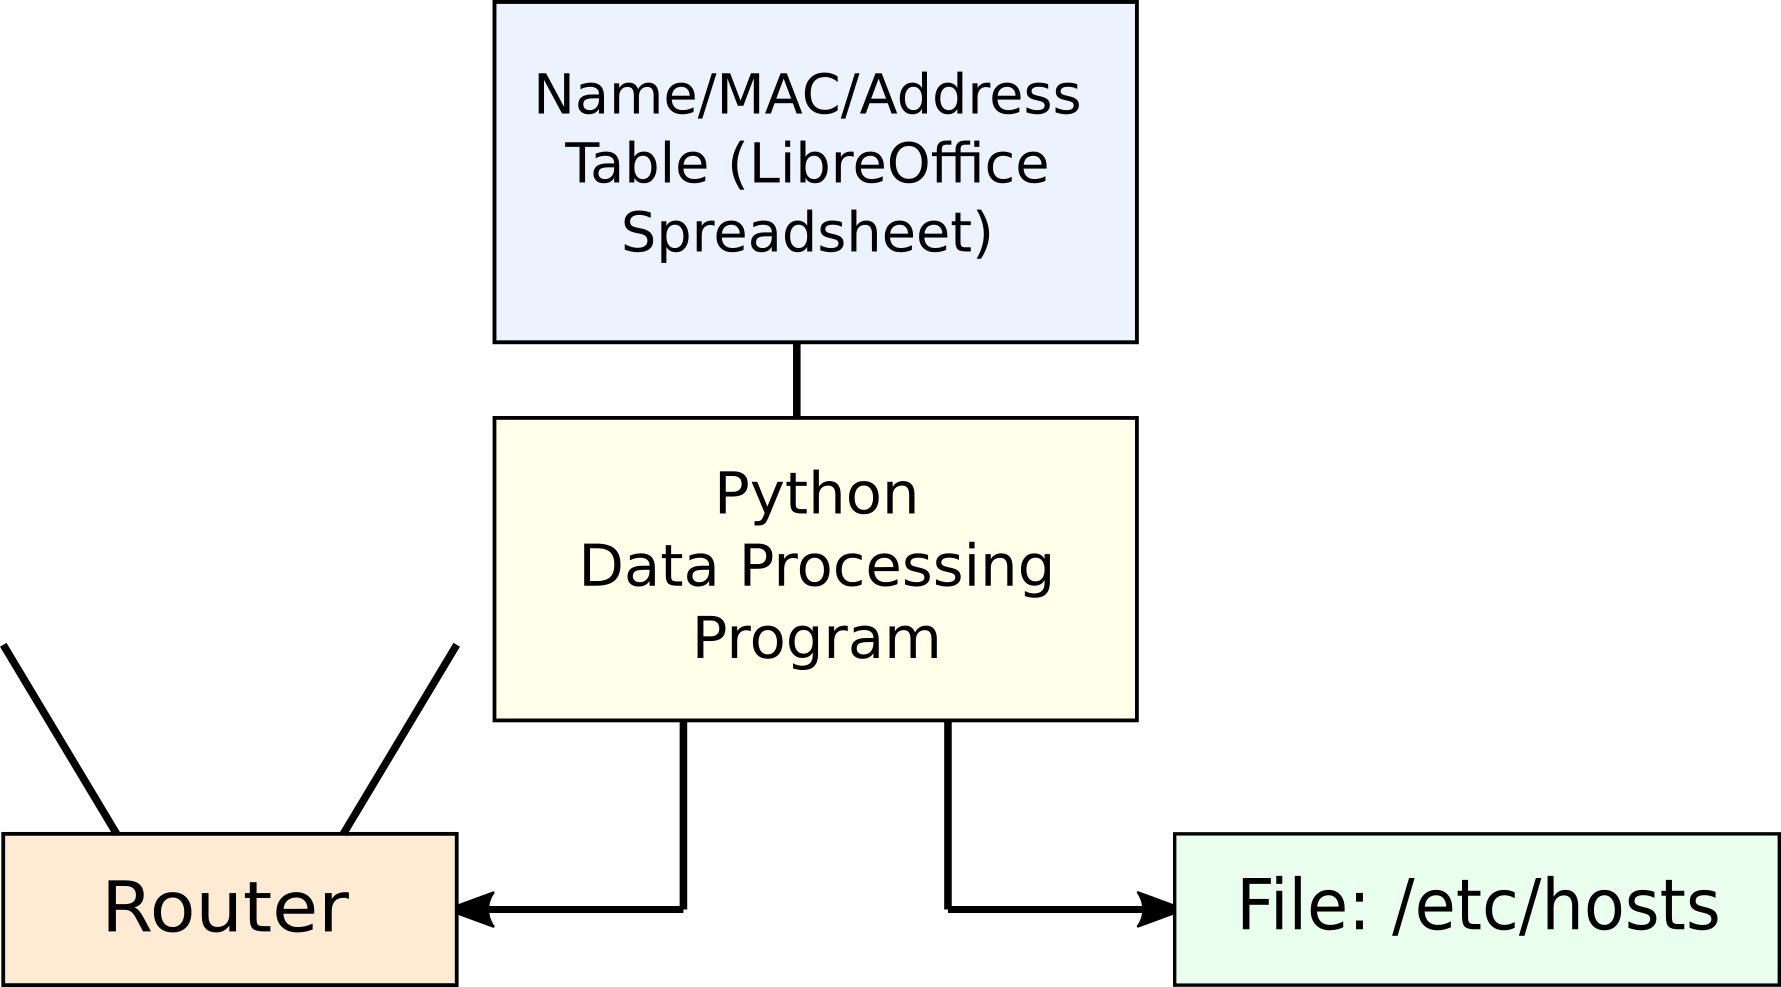
Figure 1: System Block Diagram
- The Name/MAC/Address table is a LibreOffice spreadsheet, easy to edit, easy to read in a Python program.
- The Python program reads the spreadsheet's data table and creates:
- A table of MAC/IP pairs suitable for programming the router's DHCP address reservation feature (left branch in Figure 1).
- A table of name/IP pairs suitable for insertion into a special hosts file template (explained below) for system-wide name resolution (right branch in Figure 1).
- The Python program accesses the router through its Web interface and inserts its generated MAC/IP data into the router's address reservation table.
- The Python program inserts its generated name/IP table into a special template hosts file.
- Each local system gets a copy of the generated hosts file.
The following sections provide detail on each element shown above.
The repository for all the name/MAC/IP information is a LibreOffice spreadsheet that looks like this:
Name MAC IP Comment pl-alpha a9:3b:87:28:77:d5 192.168.0.1 Wired NICs for desktops/laptops pl-beta 1c:e6:a4:8c:d7:36 192.168.0.2 pl-delta 52:e3:5b:5f:25:73 192.168.0.3 pl-eta d7:e4:a1:1e:64:79 192.168.0.4 pl-alpha-w cd:7d:68:6b:c9:7e 192.168.0.10 Wireless NICs for desktops/laptops pl-beta-w 11:27:ab:ce:96:1f 192.168.0.11 pl-delta-w bf:63:ff:cc:bd:35 192.168.0.12 pl-eta-w 41:76:41:03:a2:c6 192.168.0.13 pl-s2 3a:95:ad:0a:a2:ae 192.168.0.20 Android devices pl-s3 79:b9:40:3e:5a:ed 192.168.0.21 pl-s5 e5:18:a9:49:74:3b 192.168.0.22 pl-s7 be:8d:83:92:11:59 192.168.0.23 pl-cam1 b7:80:ba:dc:ba:84 192.168.0.30 DCS-930L_02A913 pl-cam2 40:6e:28:7c:4b:bc 192.168.0.31 DCS-930L_02850B pl-cam3 5d:68:e3:02:ac:90 192.168.0.32 DCS-930L_028508 pl-cam4 a3:3e:a3:21:c9:fc 192.168.0.33 DCS-930L_0E8559 pl-cam5 81:77:53:fb:43:64 192.168.0.34 DCS-930L_0CCE17 pl-cam6 82:32:a1:12:b0:25 192.168.0.35 DCS-930L_0CCD95 pl-cam7 dc:3e:bd:3c:b3:09 192.168.0.36 DCS-930L_0E8862 pl-kodi 67:73:a0:f8:86:f8 192.168.0.50 Raspberry Pi units pl-kodi-w b6:b6:0a:32:6a:ae 192.168.0.51 pl-pi f3:2e:92:4d:5d:f4 192.168.0.52 pl-pi-w b0:63:30:0f:3f:fb 192.168.0.53 minolta3100 a2:84:83:e4:41:7c 192.168.0.70 Color laser printer pl-isy99 92:a9:6f:79:f9:2d 192.168.0.71 Insteon controller rx-v673 e6:0a:c6:0d:72:67 192.168.0.90 Yamaha amplifier sonydvd 8a:40:9b:fe:a3:c4 192.168.0.91 Sony Blu-ray player pl-wireless-a df:98:af:74:c3:a4 192.168.0.95 The routers must be statically addressed. pl-wireless-a-2.4 99:06:c2:d5:7c:e3 These entries are primarily for record-keeping. pl-wireless-a-5 09:44:ee:69:20:97 pl-wireless-b d4:c2:60:21:7e:ff 192.168.0.96 pl-wireless-b-2.4 bd:c0:65:e1:93:eb pl-wireless-b-5 6f:a7:e6:f2:20:2b pl-wireless-c 0b:fa:0d:7d:83:b3 192.168.0.97 pl-wireless-c-2.4 77:be:30:8b:a4:e5 pl-wireless-c-5 1a:8a:d8:f6:a3:34 pl-wireless-d 0f:0f:11:88:71:4f 192.168.0.98 pl-wireless-d-2.4 58:3f:82:a6:30:5d pl-wireless-d-5 97:e6:f8:13:36:56 IP addresses >= 100 reserved for DHCP
- For security reasons the listed MACs are just random numbers.
- Click here to download an example spreadsheet like that shown above — it can serve as a starting point for your own master name/MAC/IP database.
- To use a spreadsheet like the above with the Python program described below, the column titles Name, MAC and IP must be included (not necessarily in the order shown).
- Because this is a master list of network data, the comment field is very useful, even though it's not required to be present.
- For compatibility with the Python program described below, your spreadsheet should be an ODS document (like the example above), the file format used by LibreOffice Calc. It's an Open Document Format that can be easily decoded and used in any environment.
Here's a listing of the Python program that reads the spreadsheet, programs the router, and generates the hosts file content (click here to view/download the plain-text source file):
Here are some details (click the links to scroll the program listing):
- In lines 63-65 in the above listing, the program tries to ping the router and quits the program if the router doesn't respond.
- In lines 67-75 the program creates an encrypted authorization string consisting of username and password, in a format the router should recognize and accept.
- In lines 84-95 the program acquires a session instance and configures it with the two data elements the router requires.
- In lines 99-105 the program validates the username and password with the router and quits the program if the router rejects them. This validation is optional — the router will accept a correct username/password authorization code without making this call in advance.
- In lines 115-132 the program reads the spreadsheet file and creates a table of Name/MAC/IP data.
- In lines 136-151 the program reformats the name/MAC/IP data into the form required by the router and hosts file.
- In lines 157-158 the program deletes any prior reserved address data in the router.
- In lines 169-182 the program configures the router with reserved address values and formats a table of similar data for the system hosts file.
- In lines 194-198 the program uses a regular expression to insert the hosts-data table into the system hosts file between two special delimiter marks.
- In lines 202-206 the program reboots the router, which is required for the new address reservation entries to take effect.
Again, the call to the router's login page (lines 99-105) is optional. In the normal interaction between a browser and the router, the user enters a username and password in a router-provided form, client-side code encrypts and forwards the user's entries, and the router validates them. If the entries are correct, the authorization string is present in the headers exchanged between the browser and router for the entire transaction. In the Python approach, the program creates the encrypted string the same way a browser would, which means there's no requirement to visit the login page. But the validation check serves an important purpose — if the username and/or password are incorrect, the router will refuse to carry out the program's instructions as the transaction proceeds, and after ten failed calls this specific router will print an error message about the user being locked out and to "try again in two hours." At that point, one can simply power-cycle the router and start over, but it's simpler to validate the username/password in advance of trying to accomplish anything useful.
The above exposition obviously will only work perfectly with one router from one vendor (for this example, it was a TP-LINK Archer C5). In this section I will explain how to perform the required preliminary research to make the same basic method work with any commonly available router — or, for that matter, any device with a Web interface.
Here are some key points:
- The entire transaction between a Web browser and a device's Web interface should be visible on the local network.
- So, unless a device supports an encrypted connection (i.e. Transport Layer Security, revealed by the URL prefix https://), it should be possible to monitor the transaction using tools like Wireshark and similar network monitoring tools.
- If the router does use an encrypted connection, it's still possible to discover how the interface works, using Web browser developer tools, which can be used to record complete transactions in plain-text. In fact, whether or not encryption is an issue, browser developer tools, network monitoring in particular, are probably the best way to find out how a router's Web interface works.
- Commonly available Linux browsers — Chrome, Chromium, Firefox — include developer tools suitable for monitoring network transactions. Here are examples for Chrome (Chromium works the same) and Firefox:
- Chrome:
- Access the developer tools: go to the menu icon at the upper right (three vertical dots), choose More Tools ... Developer Tools.
- This will open a separate pane, by default located at the right, containing a lot of initially confusing content.
- Click the "Network" tab and enable the "Preserve Log" option.
- Make sure the record button (upper left, round and red when enabled) is enabled.
- Carry out some transactions you want to record. This will produce some content in a display area below the options pane.
- To save a captured network log, right-click anywhere in the content display area and review the options.
- For the example, choose "Save as HAR with content" and choose a suitable filename and destination.
- For analysis hints, see below.
- Firefox:
- Access the developer tools: go to the menu icon at the upper right (three horizontal lines), choose the wrench icon.
- Choose the "Network" menu option.
- Carry out some transactions you want to record. This will produce some content in a display area below the options pane.
- To save a captured network log, right-click anywhere in the content display area and review the options.
- For the example, choose "Save all as HAR" and choose a suitable filename and destination.
- For analysis hints, see below.
In the analysis phase, we can examine the content of HAR (HTTP Archive format, a JSON-formatted document) log files saved in the above examples using any convenient editor or search tools:
- To see the broad outline of the transaction, search for requests and responses in temporal order.
- To search for requests (which originate in the browser), use "request": { as a search string (the quotes are part of the search string).
- To search for responses (which originate in the router), use "response": { as a search string (the quotes are part of the search string).
Here's an example search outcome in my editor Arachnophilia:
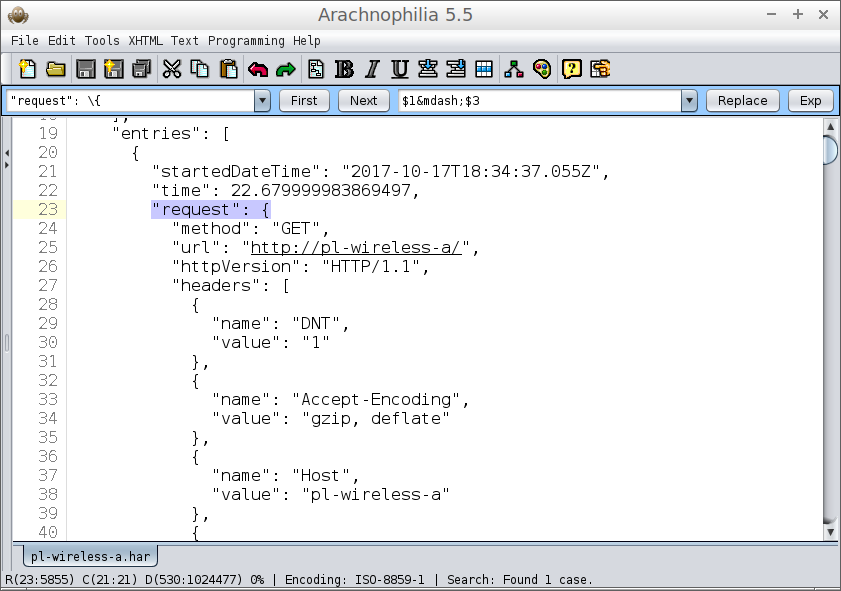
Figure 2: Using a text editor to search a HAR file
We can also use Wireshark to capture the network transaction. Here's an example image in which Wireshark monitors the beginning of the Python program's interaction with the router:
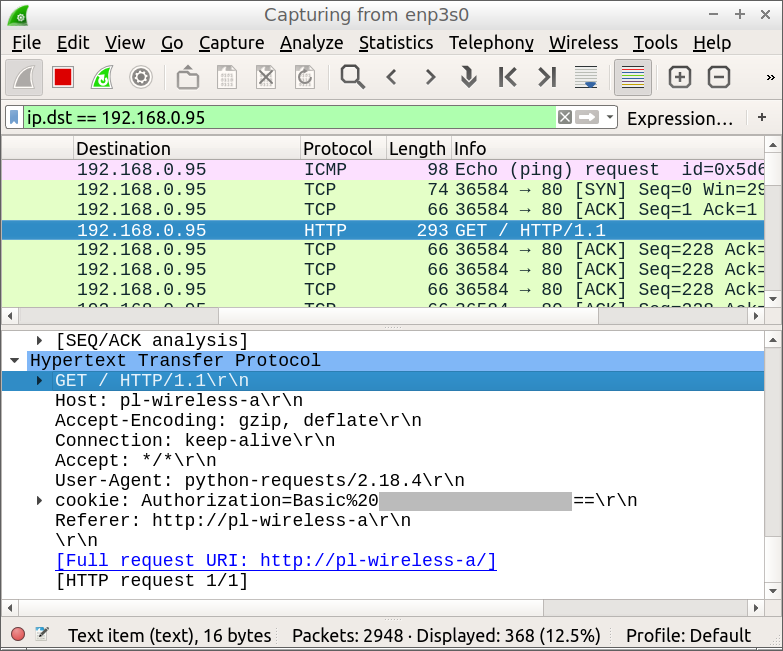
Figure 3: Wireshark monitoring a router transaction
- For this example Wireshark is set up with a display filter of "ip.dst == 192.168.0.95", the IP of my router. This filter accepts only packets having the router as their destination, the packets of greatest interest.
- The first packet in the list (top pink line) is the initial ping access generated by lines 63-65 of the Python program.
- The packet highlighted in deep blue is the username/password validation test from lines 99-105 of the Python program. This display is particularly interesting because it shows the exact header contents for the transaction. Even though the provided user agent is "python-requests/2.18.4", obviously not a typical browser, the router doesn't care — it accepts the username and password. I mention this because much is made of providing a plausible user-agent string in transactions of this kind. I doubt that many devices reject user agents that don't resemble Internet Explorer, Chrome or Firefox.
- The basic strategy for creating a Web-interface automation program is to include everything that a browser includes, test the result, then see how few items can be included and still produce the desired result. For the router used in this experiment, the only required items were the authorization and referer fields. More sophisticated routers/devices may require more information.
Acquiring MAC addresses
There are a number of ways to detect your network's MAC (Media Acces Control) addresses. One effective way is to use the "nmap" command-line utility — first, get as many devices and systems interacting with the local network as practical, then run "nmap" as root, like this:
# nmap -sP --max-rtt-timeout=50ms (IP address + a range, example 192.168.0.1-255)The above will list IPs and MACs for the connected devices on the local network in the provided address range, so it's a very efficient way to create a large list. (The provided RTT timeout value of 50 milliseconds is normally more than enough time for local network devices to respond, and it greatly speeds up local scans compared to the default value.)
Another way is to issue "ifconfig" from any system whose MAC addresses you need:
$ ifconfigThe above will list network interfaces, their IP addresses where possible, and the MACs of any hardware devices (using the label "ether", as in "ether e8:a6:ab:a4:8f:23") even for interfaces that aren't connected.
Hosts file format
The Python program can insert a complete list of system names and IPs into the local hosts file or a working copy, preferably the latter. The path entry for this file in the Python program is line 194, and the user should change the default. Within this hosts file, add two tags, any convenient location, that look like this:There's no need to put blank lines between the two tags, and the tags are themselves preserved in the file over repeated runs of the Python program. The Python program inserts one hosts-formatted entry (i.e. IP address and name) for each record in the spreadsheet that included a name and IP address (the MACs don't appear in the hosts file).
Let me add something here, something seemingly orthogonal to the topic. I originally wanted to use nicely formatted IP addresses in the hosts file, addresses that look like this:The advantage to these long IP addresses is that they sort rationally and look nice as well. But guess what, boys and girls? If you use three-digit IP addresses in /etc/hosts, Linux won't accept them — it requires the use of minimal-length IP addreses like this:
If this unwritten rule isn't followed, the system will fail to translate names to IP addresses, with no warning or notification. ... End of digression.In my network I have a hosts template file that receives the Python program's name/IP list, then a large list of ad-blocking IP addresses, before being copied to /etc/hosts on each local system for actual use. So when I retire a network device or acquire a new one, I edit the name/MAC/IP spreadsheet, run the above Python program to reconfigure my router, then copy the resulting hosts file across my network. As I said earlier, if I had network devices arriving and departing on a daily basis, this scheme wouldn't work and I would be better off using Zeroconf -- this method is only suitable for local networks that are relatively stable.
Compared to the earlier Zeroconf configuration, using this scheme makes my network significantly faster, and certain devices that over time would become inaccessible orphans under Zeroconf, remain visible in the new system.
Thanks for reading.
| Home | | Linux | | | | Share This Page |